Your website logo is one of the first things visitors notice. It represents your brand and helps people recognize your website. If you have recently changed your business name, redesigned your brand, or simply want a better-looking logo, you may need to replace the existing logo on your WordPress website.
Fortunately, learning how to change WordPress logo is simple. You usually do not need coding knowledge or advanced technical skills. WordPress provides built-in options that allow you to upload and display a new logo.
Why Should You Change Your WordPress Logo?
A logo should match your current brand identity. An old, blurry, or poorly sized logo can make a website look less professional.
You may want to change your logo when:
- You rebrand your business
- You create a new website design
- Your existing logo has low quality
- You want a transparent logo
- You want your website to look more modern
- Your current logo does not match your colors
Before uploading a new logo, prepare a high-quality image in PNG, JPEG, or another format supported by your WordPress setup. A transparent PNG is often useful when you want the logo to blend naturally with your website header.
How to Change WordPress Logo Using the Customizer
The exact steps can vary depending on your WordPress theme. However, many classic themes provide a logo option through the Customizer.
Step 1: Log In to WordPress
First, log in to your WordPress admin dashboard.
Your dashboard is usually available through your website’s WordPress login page. After signing in, you will see the main administration menu.
Step 2: Open the Customizer
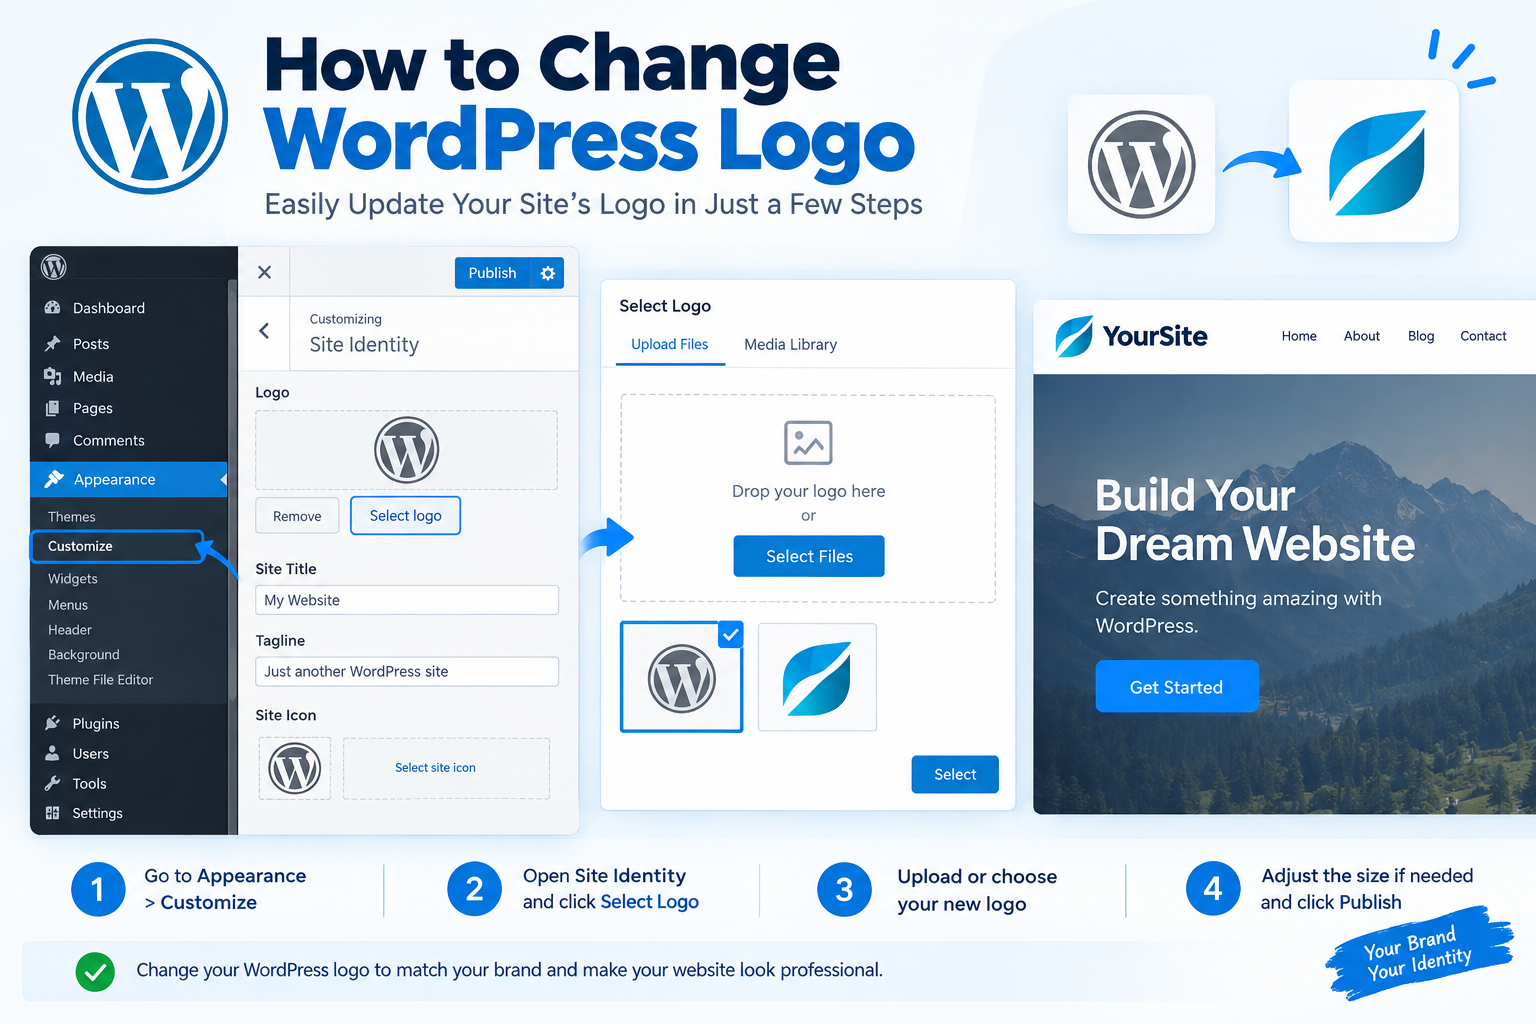
From the dashboard, go to Appearance and select Customize.
The Customizer lets you change different parts of your website without editing code. Depending on your theme, you may see options such as Site Identity, Header, Colors, Menus, and Widgets.
Step 3: Open Site Identity
Look for the Site Identity section. This area commonly contains settings for your website title, tagline, site icon, and logo.
Click the logo option to view the current logo.
Step 4: Select or Upload Your Logo
Click Select Logo or the option provided by your theme.
You can choose an image that already exists in your WordPress Media Library. If your new logo has not been uploaded yet, select the upload option and add the image from your computer.
Choose a clear, high-quality version of your logo.
Step 5: Adjust the Logo
After selecting the image, WordPress may provide cropping or image adjustment options.
If your logo already has the correct dimensions, you can usually continue without making changes. Some themes also provide a logo width setting. Use it carefully so the logo remains clear without taking too much space in the header.
A well-sized logo can improve the appearance of your navigation area and make your website easier to recognize.
Step 6: Publish the Changes
Once you are happy with the new logo, click Publish.
Open your website in a new browser tab and check the header. If the old logo is still visible, refresh the page and clear your browser cache if necessary.
Changing the Logo in a WordPress Block Theme
Newer WordPress block themes may use the Site Editor instead of the traditional Customizer.
Go to Appearance and open Editor. Then select the appropriate template or header area. Click the logo or Site Logo block and choose your new image.
After making the change, click Save.
The exact interface can vary based on the theme and WordPress version. If you cannot find the logo setting, check your theme’s documentation or header settings.
How to Choose the Right WordPress Logo Size
Your logo should be large enough to remain readable but small enough to avoid taking unnecessary space.
Before uploading, consider:
- Image quality
- Logo proportions
- Transparent background
- Mobile appearance
- Header spacing
- File size
Avoid uploading an unnecessarily large image because it can increase page weight. Compressing the image before uploading can help maintain good website performance.
For additional website branding tips, use this WordPress logo customization guide to keep your visual identity consistent across your website.
What If the Logo Does Not Change?
Sometimes the new logo does not appear immediately. This can happen because of browser caching, WordPress caching, or a caching plugin.
Try these solutions:
- Refresh the website.
- Open the website in a private browser window.
- Clear your browser cache.
- Clear your WordPress caching plugin.
- Check whether the correct logo was selected.
- Check the website on a mobile device.
If the problem continues, your theme may use a separate header builder or logo setting.
Final Thoughts
Changing a WordPress logo is a straightforward way to update your website’s branding. In most cases, you can replace the logo through the Customizer or Site Editor without touching any code.
Upload a clear image, choose an appropriate size, check how it looks on desktop and mobile devices, and publish your changes. With these simple steps, you can quickly give your WordPress website a fresh and professional appearance.