Connecting a custom domain to WordPress on Hostinger is one of the first steps when launching a new website. Your domain is the address visitors use to find your website, while Hostinger provides the hosting environment where your WordPress website files and database are stored.
The process is usually straightforward, but you need to make sure the domain is added to the correct hosting plan and that its DNS settings point to Hostinger. If you purchased the domain from another registrar, additional DNS configuration may be required.
This guide explains how to connect your domain to WordPress on Hostinger step by step.
What You Need Before Connecting Your Domain
Before starting, make sure you have:
- An active Hostinger hosting plan
- A domain name
- Access to your domain registrar
- WordPress installed or ready to be installed
- Access to your Hostinger account
If your domain was purchased through Hostinger, much of the connection process may be handled automatically. If the domain is registered elsewhere, you may need to update its nameservers or DNS records.
Hostinger explains that a custom domain needs to be assigned to the website and correctly pointed to Hostinger before the website becomes accessible through that domain.
Step 1: Log In to Hostinger
Start by signing in to your Hostinger account.
From the hPanel dashboard, open the Websites section. If you already have a WordPress website, find it in the list and open its dashboard.
If you are creating a new website, select Add Website and choose WordPress. Hostinger’s current setup process allows you to create WordPress login details and select a domain during the website setup.
Step 2: Add or Select Your Domain
During the WordPress setup, you can select an existing domain or connect a domain that you already own.
Choose your preferred domain from the available options.
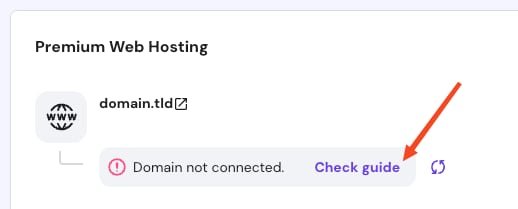
If the domain is registered with another company, Hostinger may ask you to connect or point the domain before the website can be accessed normally.
Make sure you select the correct domain because this will become the main address of your WordPress website.
Step 3: Point Your Domain to Hostinger
If your domain was purchased from another registrar, you need to point it to Hostinger.
There are different ways to do this depending on your domain’s current DNS configuration. One common method is changing the domain’s nameservers to the Hostinger nameservers provided in your hosting account.
Another option can be using DNS records such as an A record, depending on your setup.
If your domain already uses Hostinger nameservers, no additional pointing may be required. If you use an external DNS provider such as Cloudflare, you need to manage the required DNS records through that provider.
Step 4: Wait for DNS Propagation
After changing nameservers or DNS records, the changes may not appear immediately everywhere.
DNS propagation is the process through which updated DNS information becomes available across different networks and DNS servers.
Hostinger states that after a domain is assigned and DNS changes are applied, propagation can take up to 24 hours.
During this period, your website may work from one internet connection but not another. This does not necessarily mean something is wrong.
Step 5: Install WordPress
Once your domain is connected, you can install WordPress if it has not already been installed.
In Hostinger, open your website dashboard and use the WordPress setup or Auto Installer.
Hostinger’s current Auto Installer instructions use:
Websites → Dashboard → Website → Auto Installer
Then select WordPress and follow the setup instructions.
You will normally need to enter information such as your WordPress administrator email, username, password, website language, and other installation details.
Step 6: Open Your WordPress Dashboard
After WordPress installation is complete, return to the Hostinger website dashboard.
You should have an option such as Admin Panel or a WordPress management option that lets you access your WordPress dashboard.
Your WordPress dashboard is where you can manage your website content, themes, plugins, pages, posts, menus, and other settings.
Step 7: Check Your Domain
Now open your domain in a new browser tab.
For example:
If everything is configured correctly, your WordPress website should load using your custom domain.
If you see a temporary domain, connection error, or DNS error, check whether the domain is correctly assigned to the website and whether the DNS changes have finished propagating.
Step 8: Check HTTPS
After connecting the domain, it is also important to check whether SSL is active.
Hostinger provides free Lifetime SSL on eligible hosting plans, and the certificate can be installed automatically once the domain is correctly connected and pointed to the hosting account.
Your website should ideally load using HTTPS:
If WordPress is still using HTTP, check your WordPress URL settings and SSL configuration.
Common Problems When Connecting a Domain
One common problem is incorrect DNS configuration. Double-check that your nameservers or DNS records match the configuration required by Hostinger.
Another issue is DNS propagation. If you have just changed DNS settings, waiting may be necessary before the domain works everywhere.
You should also check that the domain is assigned to the correct website inside Hostinger. A domain can be pointed to the hosting account but still need to be assigned to the appropriate website.
Final Thoughts
Connecting a domain to WordPress on Hostinger involves three main tasks: adding the domain to your website, pointing its DNS settings to Hostinger, and installing or connecting WordPress.
After DNS propagation is complete, open your domain to verify that the website loads correctly. Then check HTTPS and WordPress settings to make sure everything is working properly.
If you follow these steps carefully, you can connect your domain with WordPress and get your Hostinger WordPress website ready for visitors.